apt-get install mpv mpd mpc screen psmisc python-zeep python-psutil lua-socket*
apt-get install info-beamer*On some systems you may have to compile info-beamer by yourself. Free version of Rasbperry Pi info-beamer has a small logo on the bottom of the screen!
apt-get install openbox obmenu xinitYou can skip this step if you have already Window manager installed. Instead Openbox, you can use any other window manager. It has be configured with black background, with no menus and no mouse cursor, if you are using only primary screen of course.
apt-get install x11vnc pulseaudio
/etc/systemd/system/getty@tty1.service.d/override-autologin.conf
[Service]
Type=simple
ExecStart=
ExecStart=-/sbin/agetty --autologin yourusername --noclear %I $TERM
Change yourusername with actual user name!
#start openbox
[ "$(tty)" = "/dev/tty1" ] && exec startx -- -nocursor
export DISPLAY=:0
Create autostart in ~/.config/openbox/autostart:
mkdir ~/.config/openbox/
xset -dpms s off

#Uncomment if you installed x11vnc
#x11vnc -loop -display :0 -forever &

#Uncomment if you installed mpc
#mpc play

#Uncomment if you want info-beamer script to auto start
#~/kino-player/_infobeamer/ib-start.sh &

xsetroot -solid "#000000"
#----video and osd---------------------------------------
hwdec=vaapi
ontop
fs
fs-screen=1
cursor-autohide=always
#no-input-default-bindings
osd-level=0
no-osc

#----audio----------------------------------------------
ao=pulse
audio-channels=5.1
#audio-channels=2
#audio-spdif=ac3

#----smooth motion 23.974fps,24fps,25fps on 60fps screen
video-sync=display-resample
interpolation=yes
tscale=oversample

#----images----------------------------------------------
image-display-duration=inf
This is example for Intel NUC. For Raspberry Pi try to set hwdec=drm-copy.
remixing-use-all-sink-channels = no
enable-lfe-remixing = yes
lfe-crossover-freq = 120
Download dynaMIX mpv-gui and copy main.lua and complete webui-page folder into the ~/.config/mpv/scripts/ folder.
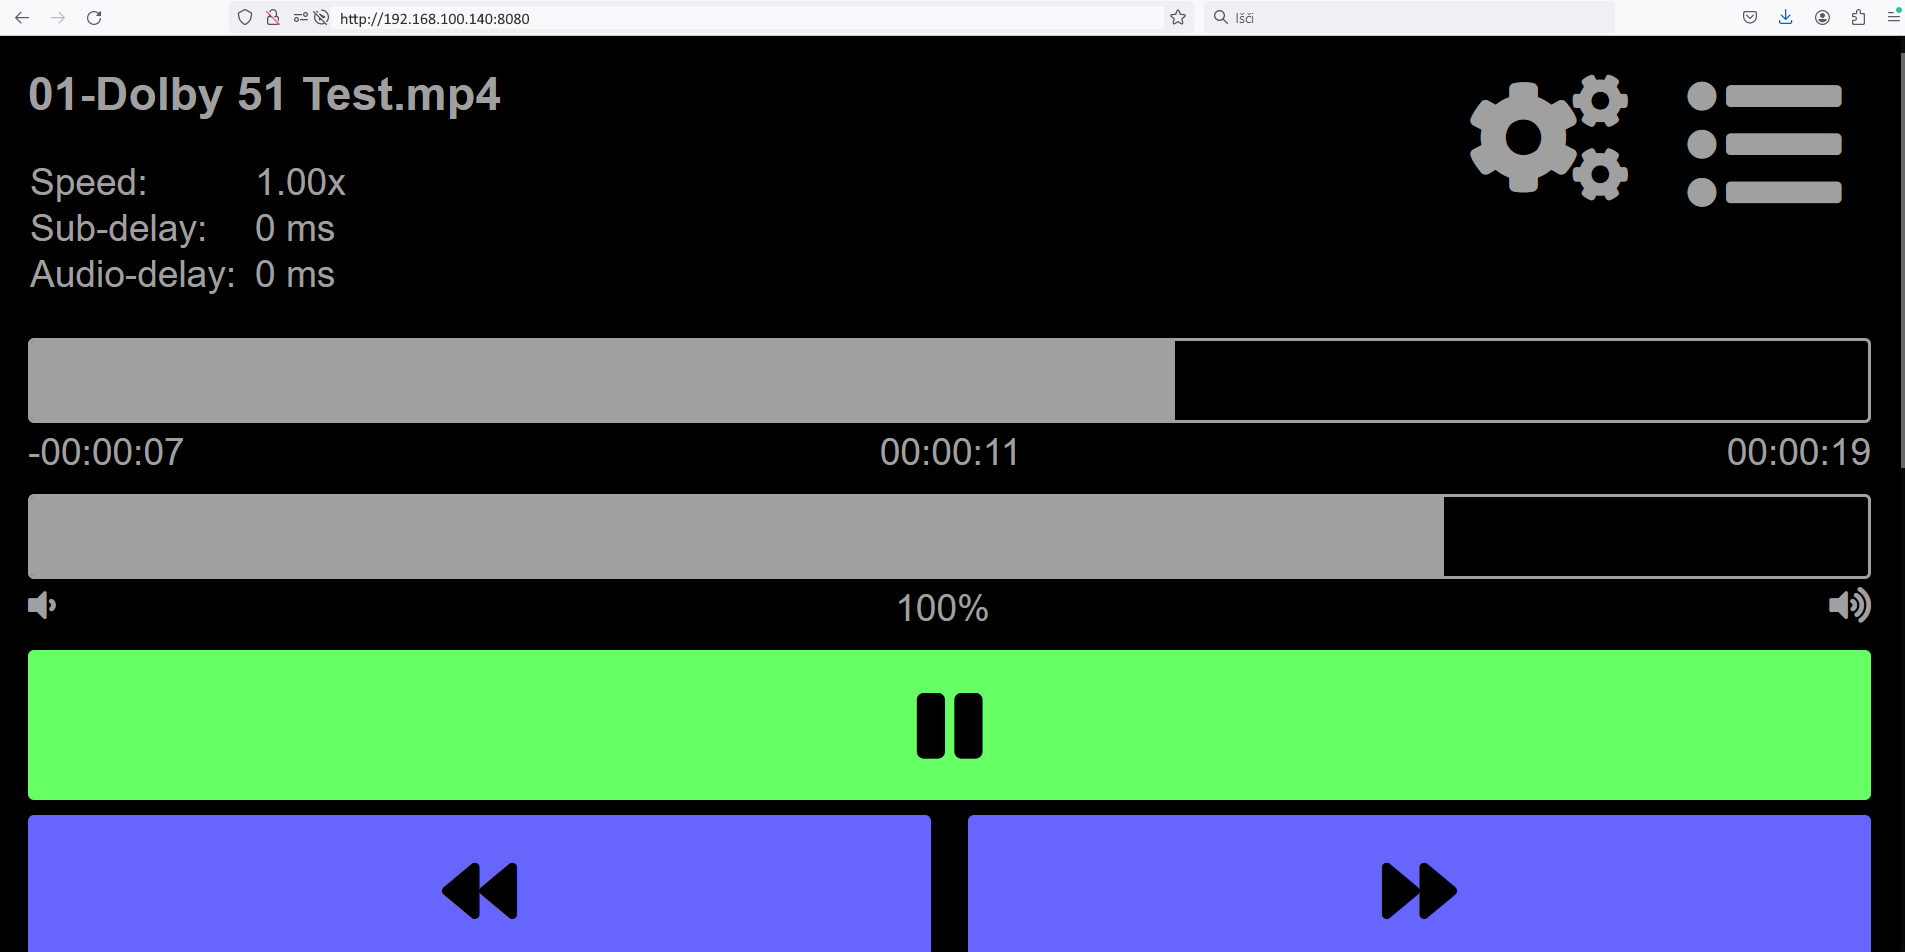
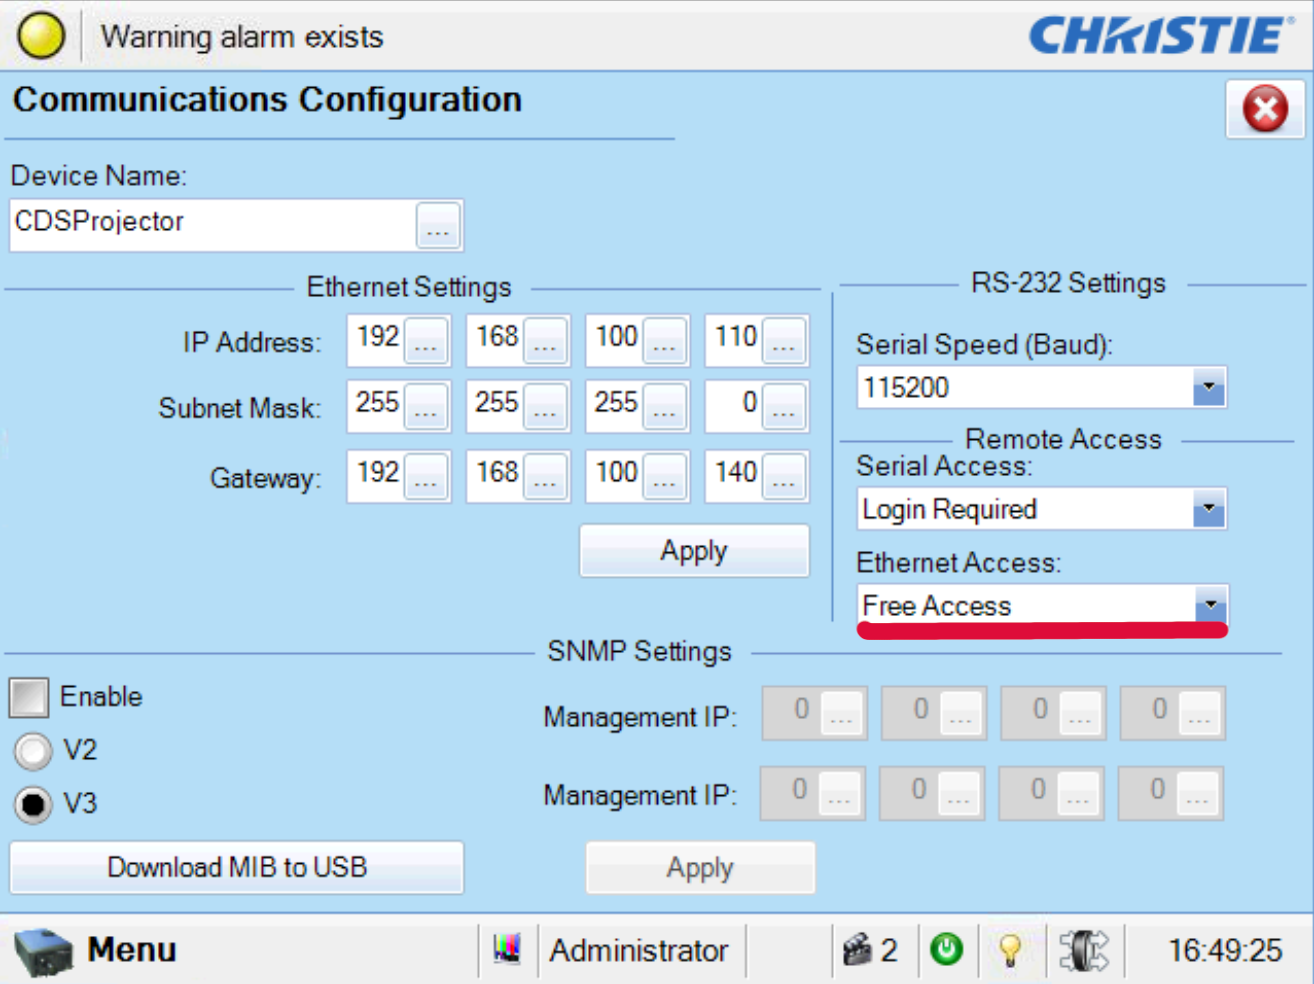
[webui] v2.1.0
[webui] 192.168.100.140:8080
Playing: Video/Test1/01-Dolby 51 Test.mp4
 (+) Video --vid=1 (*) (h264)
 (+) Audio --aid=1 --alang=und (*) (ac3)
libva info: VA-API version 0.39.4
libva info: va_getDriverName() returns 0
libva info: Trying to open /usr/lib/i386-linux-gnu/dri/i965_drv_video.so
libva info: Found init function __vaDriverInit_0_39
libva info: va_openDriver() returns 0
AO: [pulse] 48000Hz 5.1(side) 6ch float
Using hardware decoding (vaapi).
VO: [opengl] 1920x804 => 1920x804 vaapi
AV: 00:00:00 / 00:00:19 (2%) A-V:  0.000
Test dynaMIX mpv-gui by navigating with browser to http://192.168.100.140:8080:
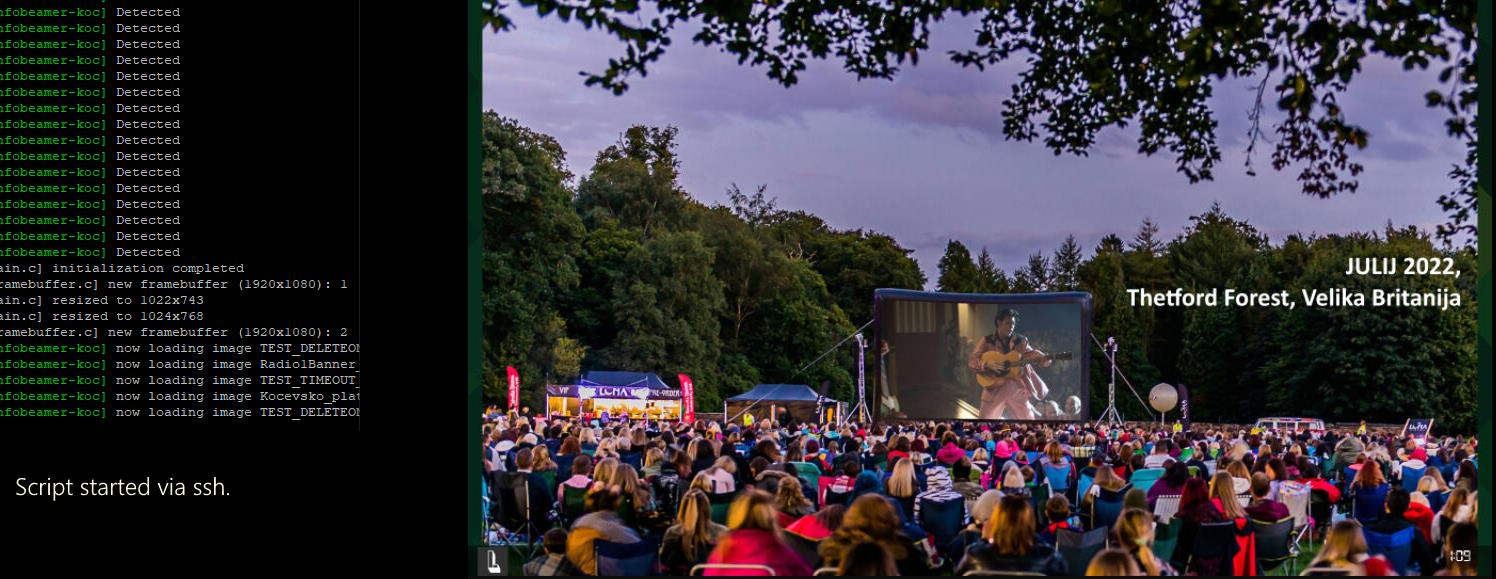
export INFOBEAMER_FULLSCREEN=1
export INFOBEAMER_WIDTH=1920
export INFOBEAMER_HEIGHT=1080
#export INFOBEAMER_BLANK_MODE=layer
if [ -d ~/kino-player/_infobeamer/ ]; then
  cd ~/kino-player/_infobeamer/
  /usr/bin/python zz----deleteoldimages.py
  pkill -9 -f zz----updates.py
  /usr/bin/python zz----updates.py&
  /usr/bin/info-beamer cinema-preshow-random-loop
fi
Script zz----deleteoldimages.py is used to delete expired images, script zz----updates.py is used to update clock on the screen.
cd ~/kino-player/_infobeamer
./ib.sh
If you rename image like this: ImageName__1210204___1520, it will be deleted on 12.10.2024, it will be shown on screen for 15 seconds and only after 20:00. Expired images are deleted only before infobeamer is started via ib.sh script.
Subfolders are not supported in this lua script, because open source infobeamer handles subfolders slightly different than the Rasbperry Pi version. Without subfolder support, this script should work on both versions. All files necessary for this script, except node.lua, start with zz----, so it is harder to accidentally delete them when uploading/deleting images.
If you using PI, make sure to read this. If you don't need mpv, you can get better performance from info-beamer without X (only framebuffer).
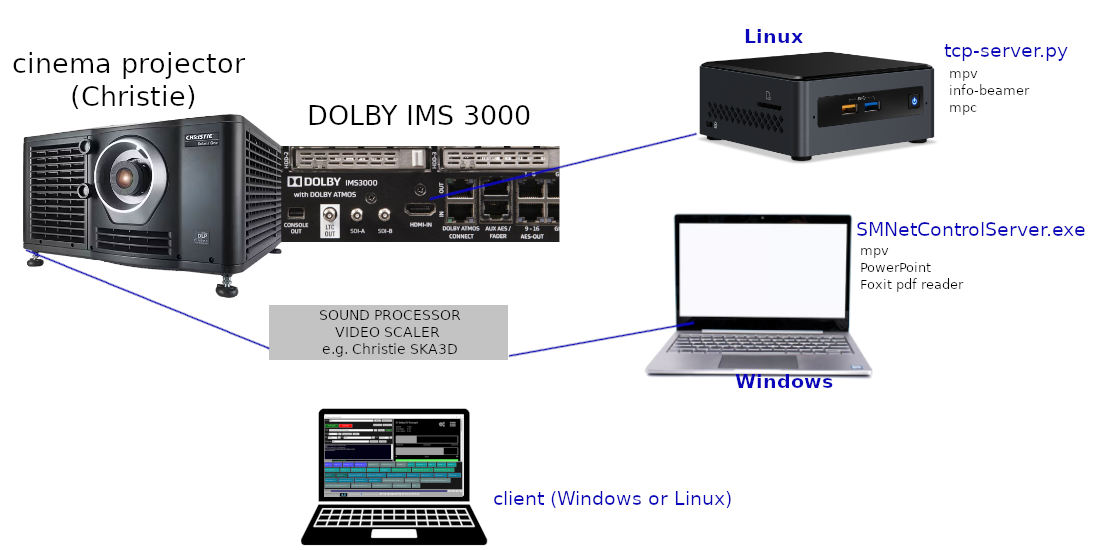
Ip address of the devices in this example:
Before installing tcp-server.py, make sure that you have kino-player folder into your home directory.
Edit ims300_macro_x in the _scripts folder and change ip address, username/password of IMS3000 according to your setup.
python /opt/dolby-soap/ims3000_macro.py "$1" "192.168.100.50:10000" "manager_username" "manager_password"Make this shell script executable! Replace manager_username and manager_password with the actual username and password!
chmod +x ims300_macro_xThere are already some other scripts in this folder.
echo '(CHA 101)' | netcat -q5 -w5 192.168.100.110 5000&
sudo mkdir /opt/dolby-soapNow copy dolby-soap into the /opt directory!
cd /opt/kino-server/
python tcp-server.py
Script was tested only on python 2.7 and 3.7.
[Unit]
Description=Tcp server for projector automation
After=network.target
StartLimitIntervalSec=0

[Service]
Environment="XDG_RUNTIME_DIR=/run/user/1000"
Type=simple
Restart=always
RestartSec=4
Environment=DISPLAY=:0
User=your_username
Group=your_group
ExecStart=/usr/bin/env python3 /opt/kino-server/tcp-server.py

[Install]
WantedBy=multi-user.target
Don't forget to change your_username, your_group and python version. Linux user name and group can not be root !
sudo systemctl enable kino-server
sudo systemctl start kino-server
Server has no GUI, only system tray icon. It must be started with correct arguments, otherwise it won't start.
The order of arguments is important!
#vo=direct3d
#hwdec=dxva2-copy

fs
fs-screen=0
#cursor-autohide=always
#no-input-default-bindings
osd-level=0
no-osc

video-sync=display-resample
interpolation=yes
tscale=oversample

image-display-duration=inf

scripts-append="D:\Windows Standalone Programs\mpv\scripts\simple-mpv-control"
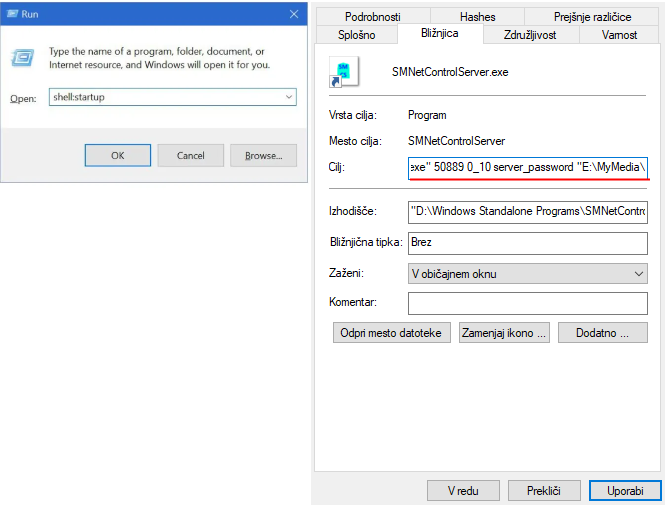
d:
cd D:\Windows Standalone Programs\SMNetControlServer\
SMNetControlServer 50889 0_10 server_password "E:\MyMedia\"
You probably already have some macros defined. You will need the names of the macros for the client application later.
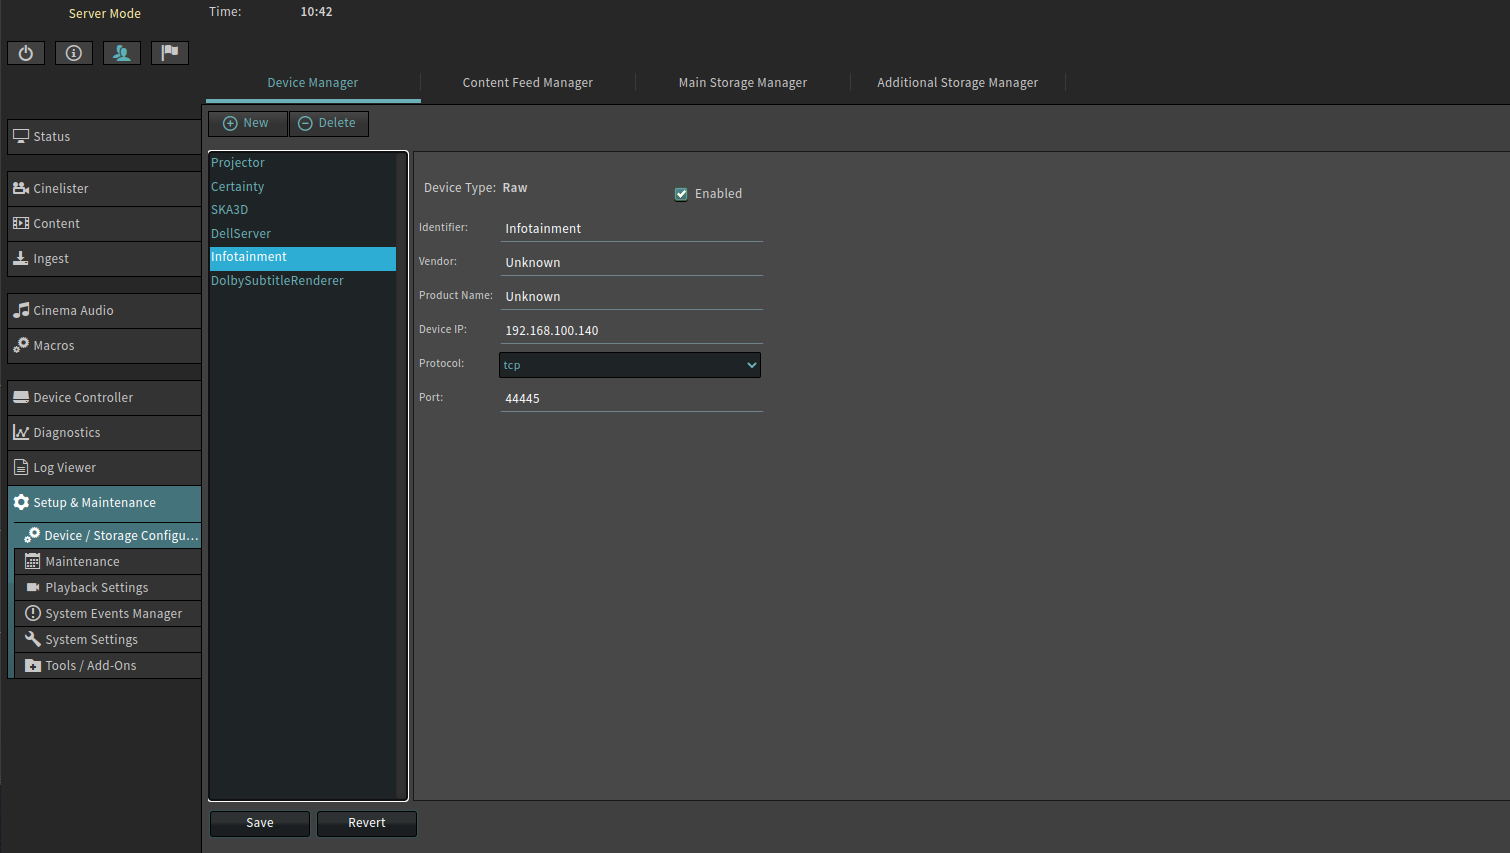
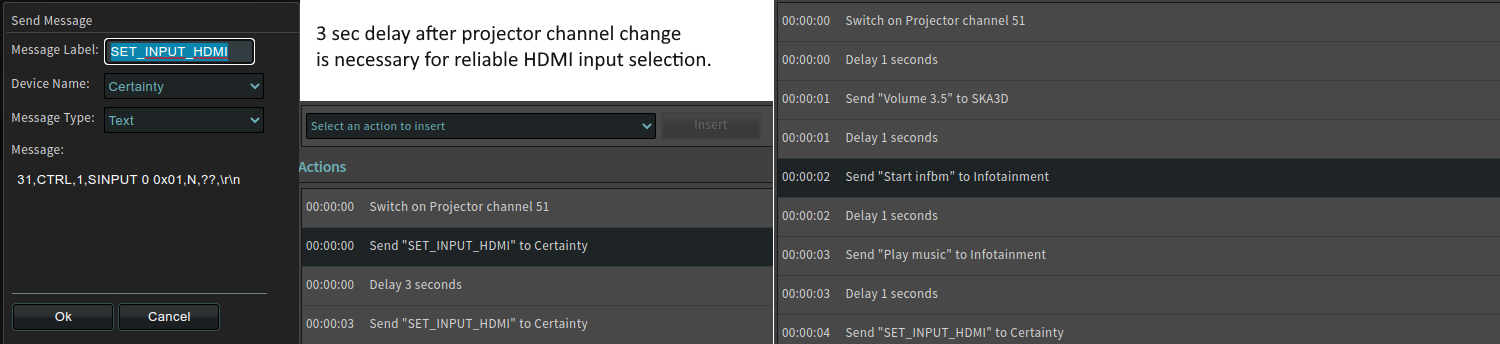
To communicate with Linux server, a new raw device must be added. In this example it is called an infotainment. Enter the ip address of the linux server and port (44445):
If you need a password, you will have to insert pwd={md5 hash of a password}? before each command!
Use one of the online tools to generate MD5 hash of the password.
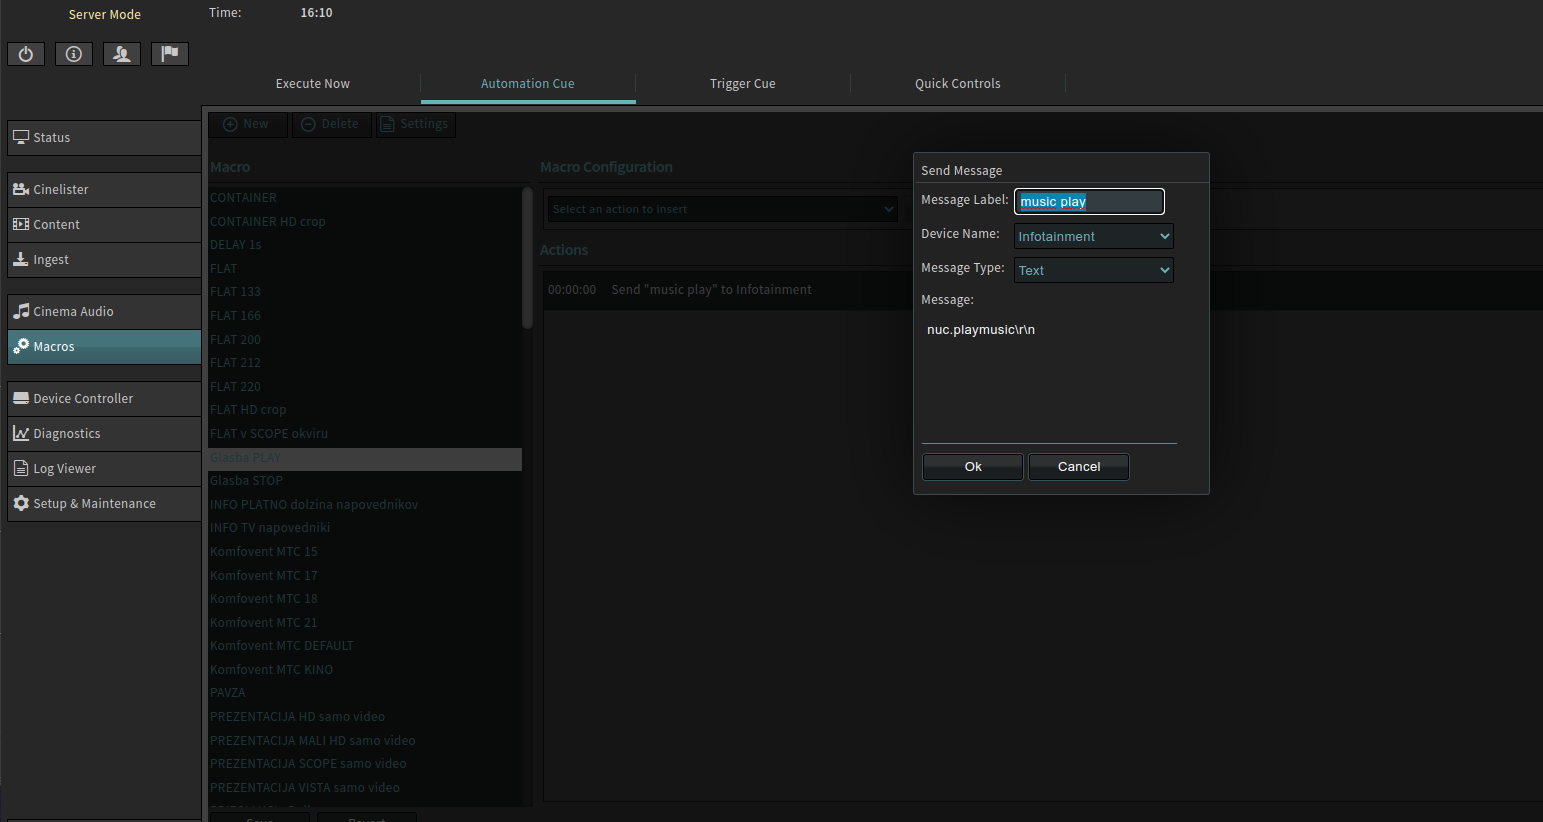
nuc.playmusic - Starts mpd playback by executing mpc play.
nuc.stopmusic - Stops mpd playback by executing: mpc stop.
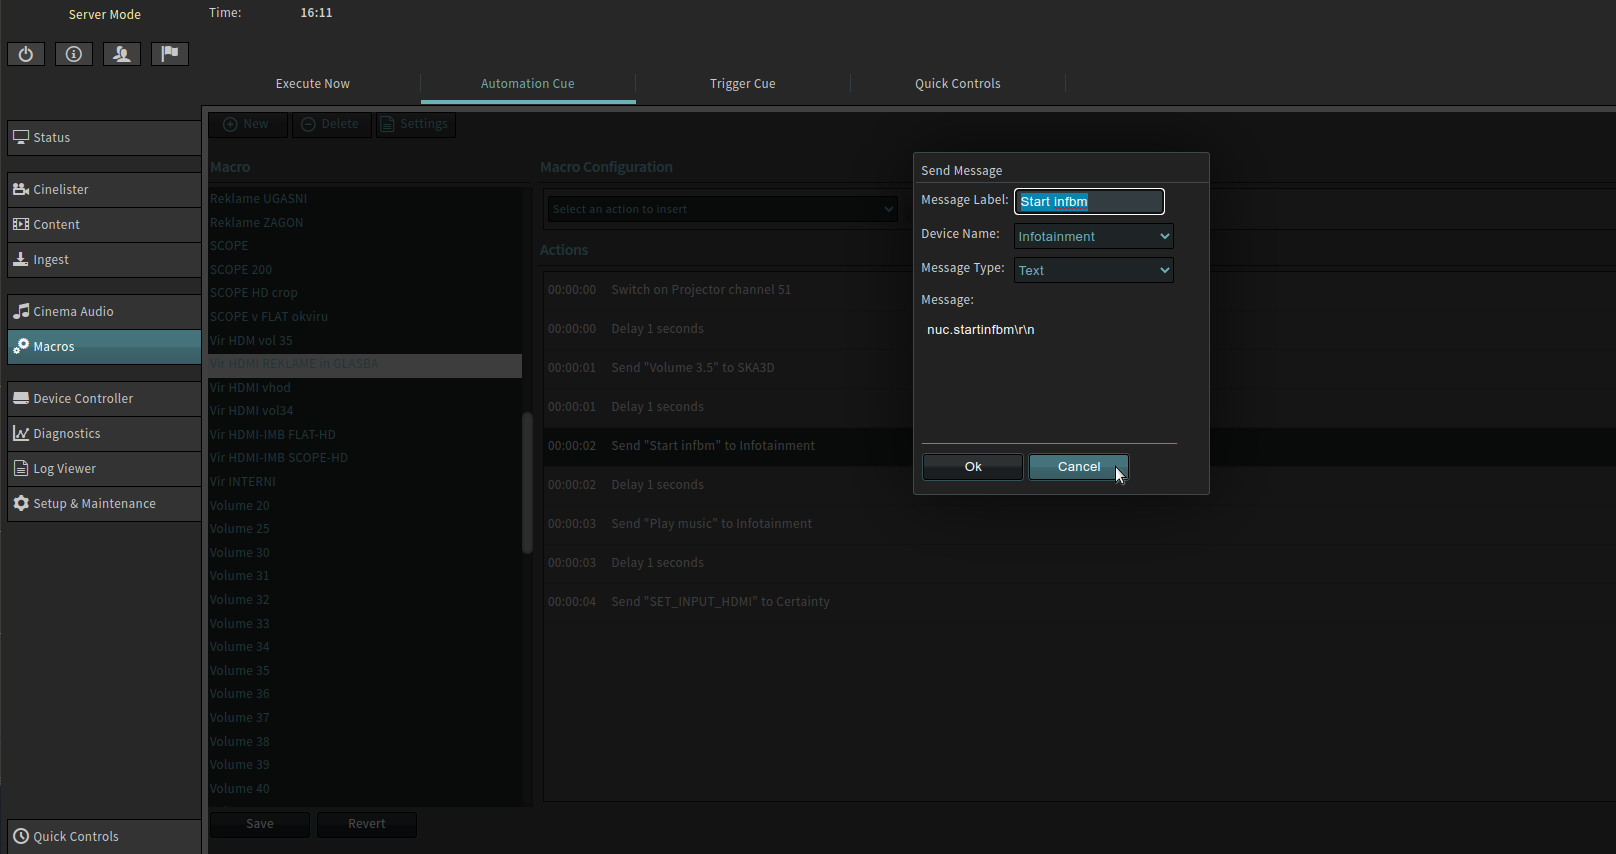
nuc.startinfbm - Starts the info-beamer lua script.
nuc.stopinfbm - Stops the info-beamer.
kino-player/script/{SCRIPT NAME} - Executes shell script in the ~/kino-player/_scripts directory. Scripts must have execution permissions.
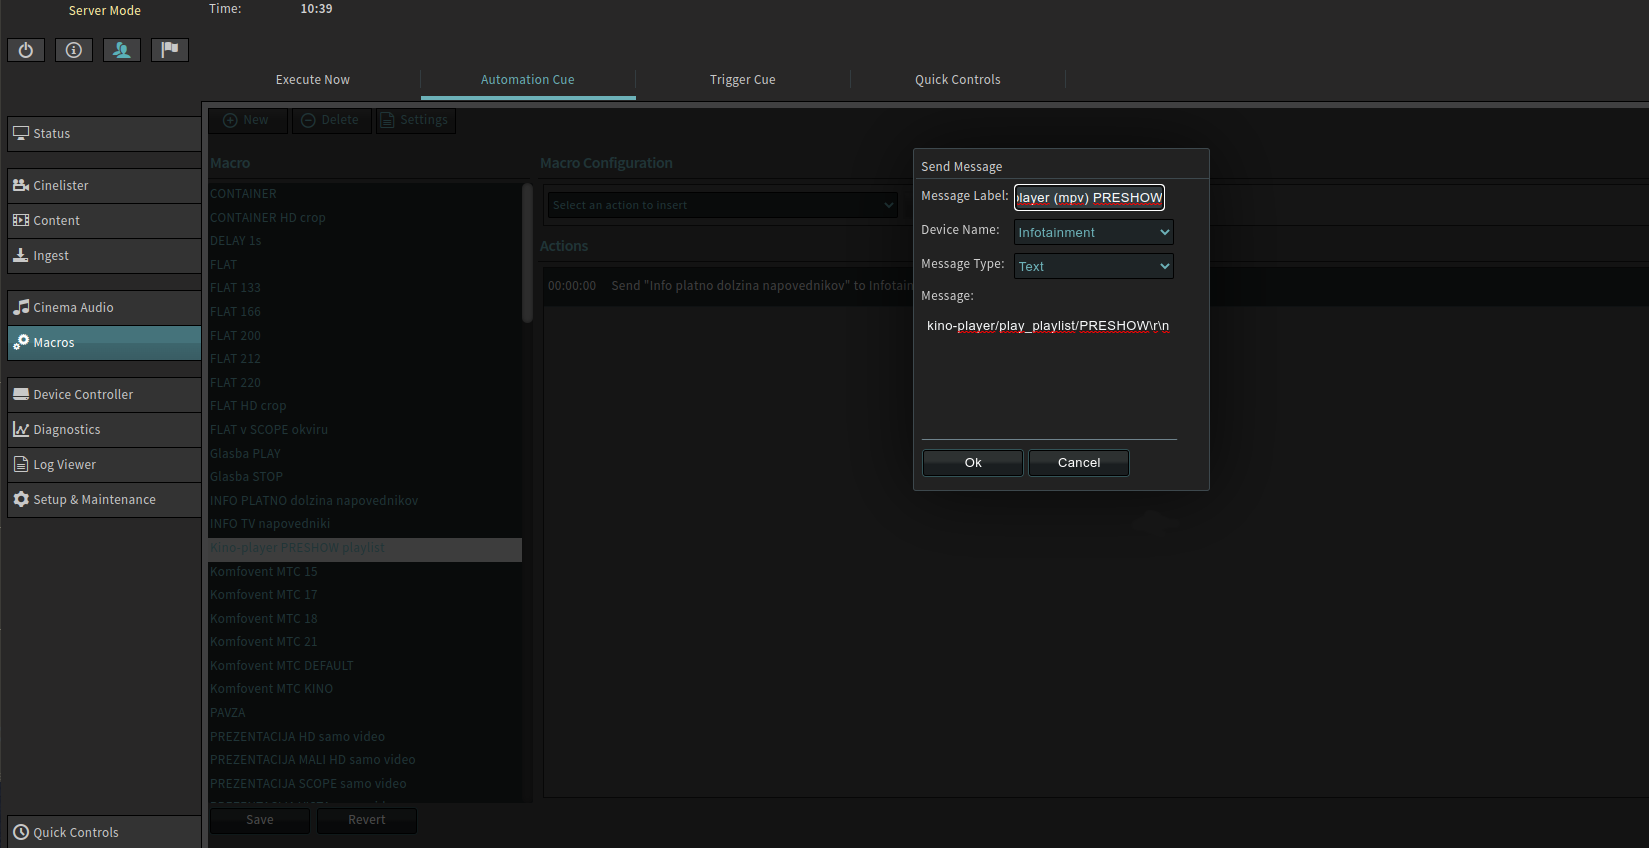
kino-player/play_playlist/{PLAYLIST NAME} - Starts the playlist (shell script actually) created with Client application. Playlists are stored in ~/kino-player/playlists directory.
kino-player/kill_playlist/ - Kills the currently playing playlist (shell script actually).
ims3000/macro/{MACRO NAME} - Executes the macro on the Dolby IMS3000. This command is meant for Client application.
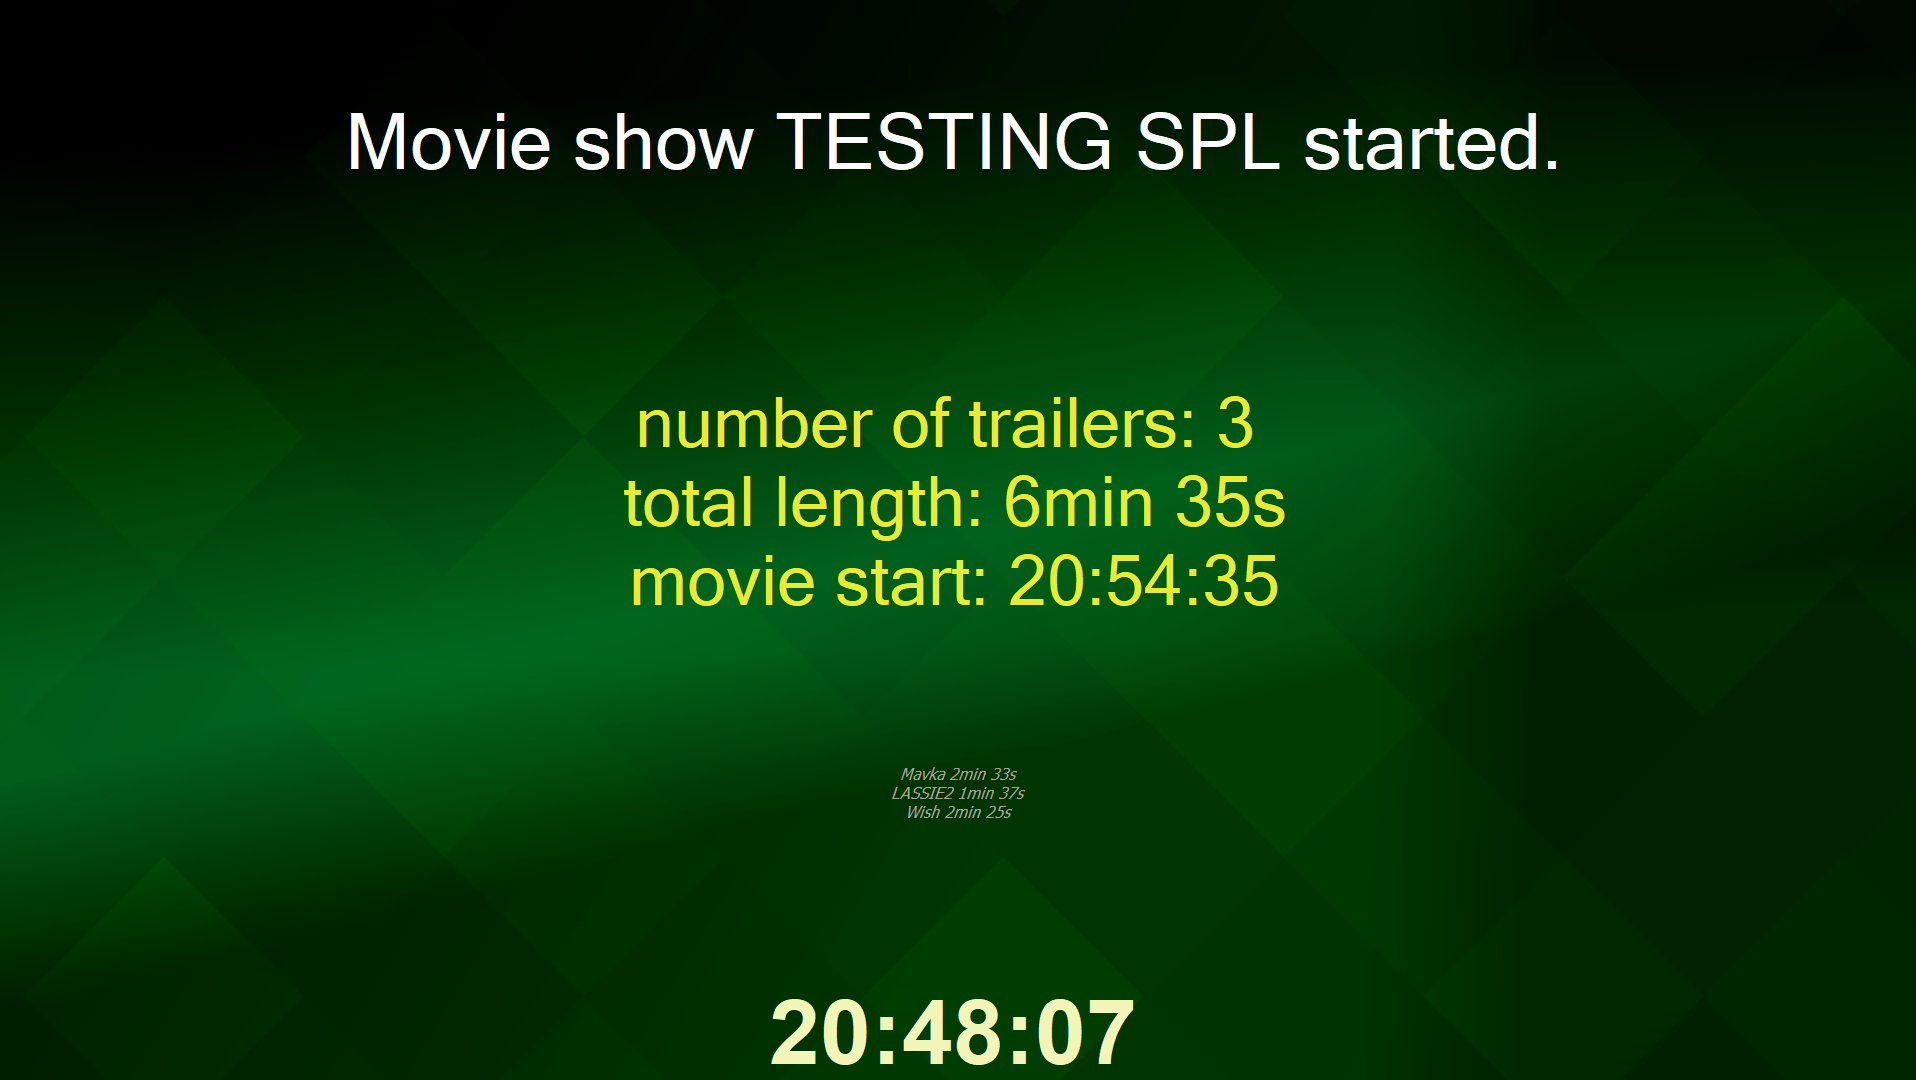
nuc.trailerinfo.tv - Displays the number and the total length of the trailers on the Windows client.
nuc.trailerinfo.screen - Displays the number and total length of the trailers on the info-beamer screen(bottom of the screen). The number of trailers is the number of cpls minus one (movie).
screen/ - Command for the info-beamer. Message is relayed to info-beamer. Text message must be json encoded. Examples: screen/picture/override:{number}, screen/picture/clear, see node.lua for more.
There are also some other commands that are useful only for the Client application.
Each command should stop with a new line (with \r\n on Dolby IMS3000 macros).
Start the info-beamer lua script from the playlist:
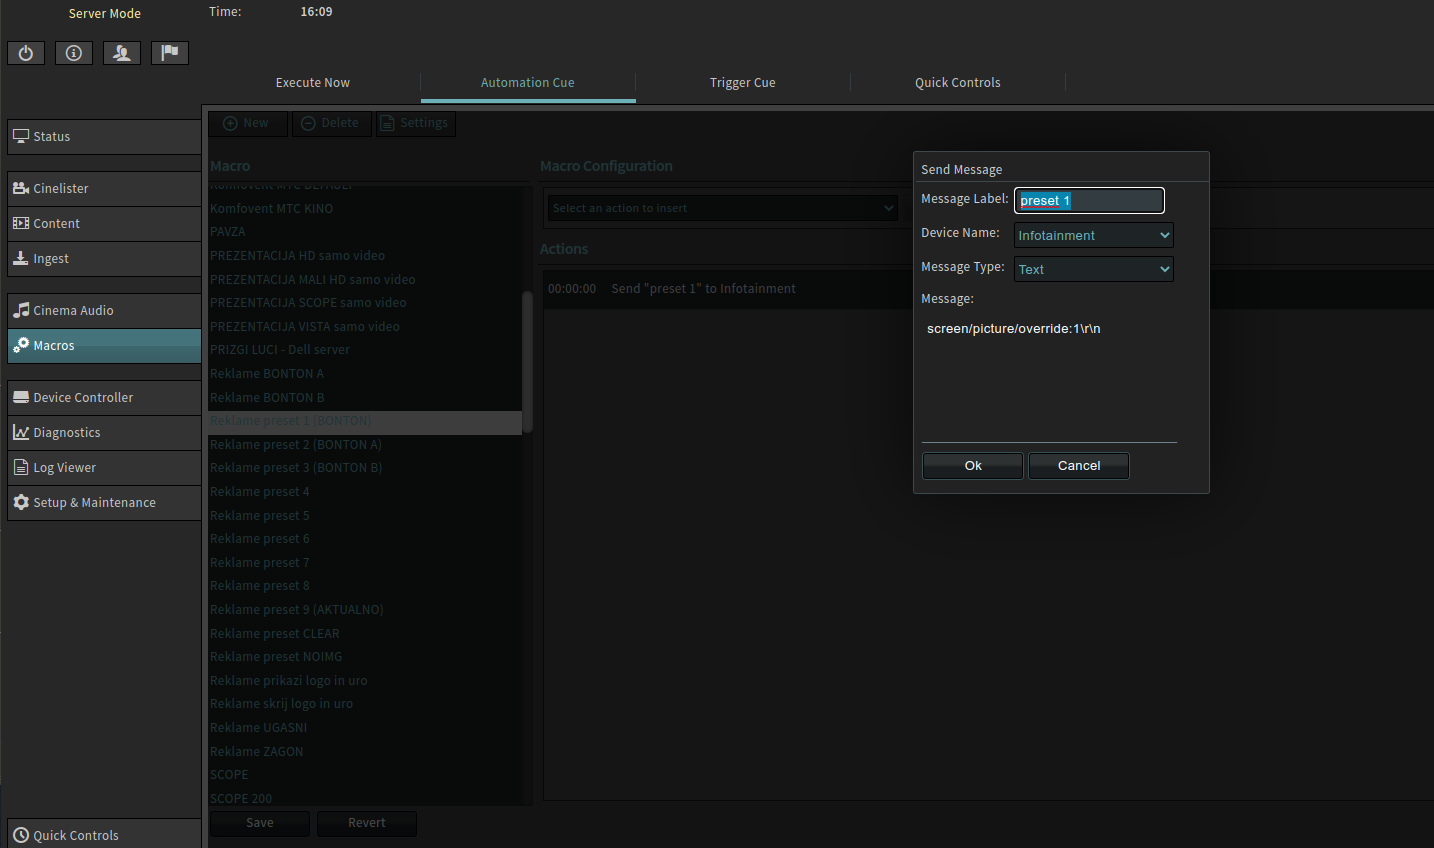
Override the current info-beamer screen with the preset image 1 (zz----PRESET1.png):
Start music (mpd/mpc) from the playlist:
Start playlist with the name PRESHOW on the Linux server (made with Client application):
Some other screenshots that you might find useful (HDMI issues, full playlist example):
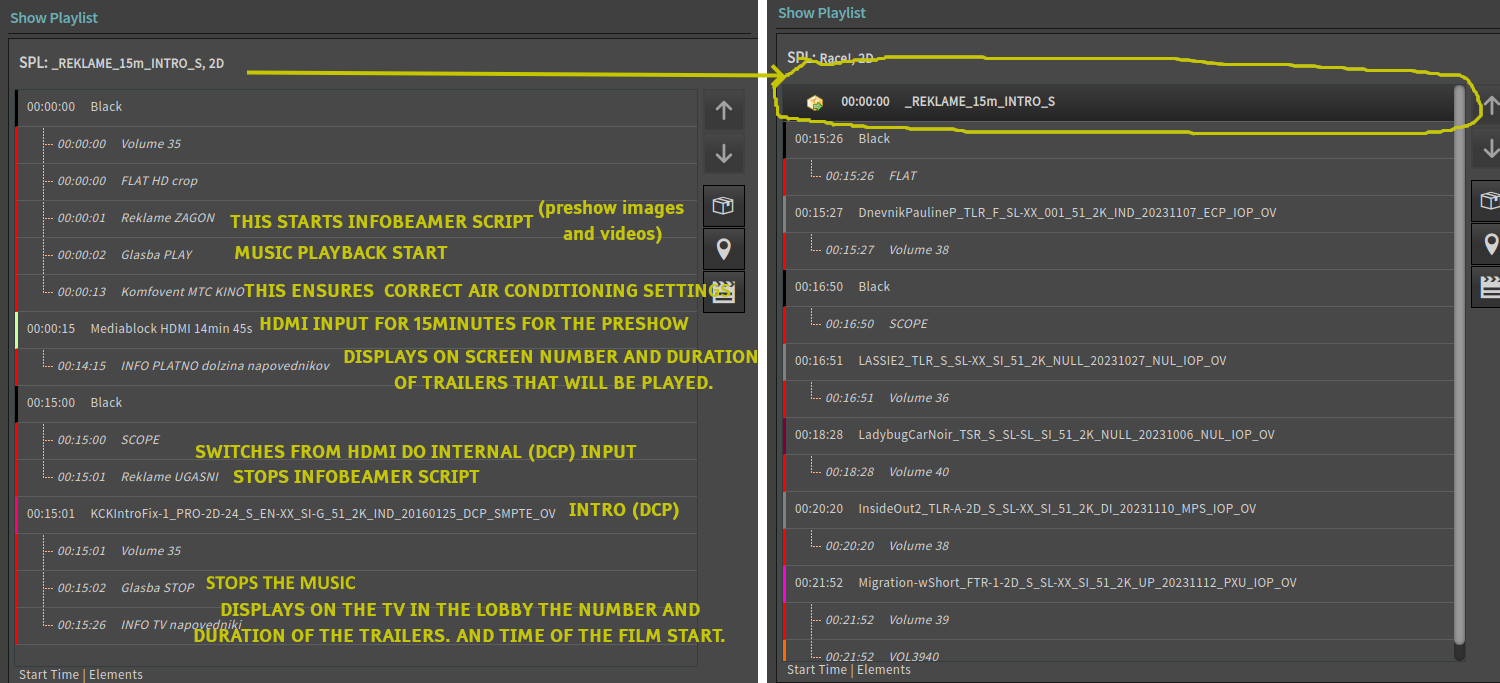
Example of notification on the screen in the lobby, triggered from a playlist.
Xibo Digital Signage on Windows OS is normally running on that screen. As soon as the trailers begin to play, SMNetControlServer.exe recieves the message from the playlist macro and displays this notification over the Xibo window:
Client application talks to both servers and IMS3000. It may help you to do things a little easier in a multi-purpose theatre.
apt-get install gstreamer1.0-plugins-bad
python3 -m pip install requests wxpython
Unfortunately macros must be set up in the application manually.
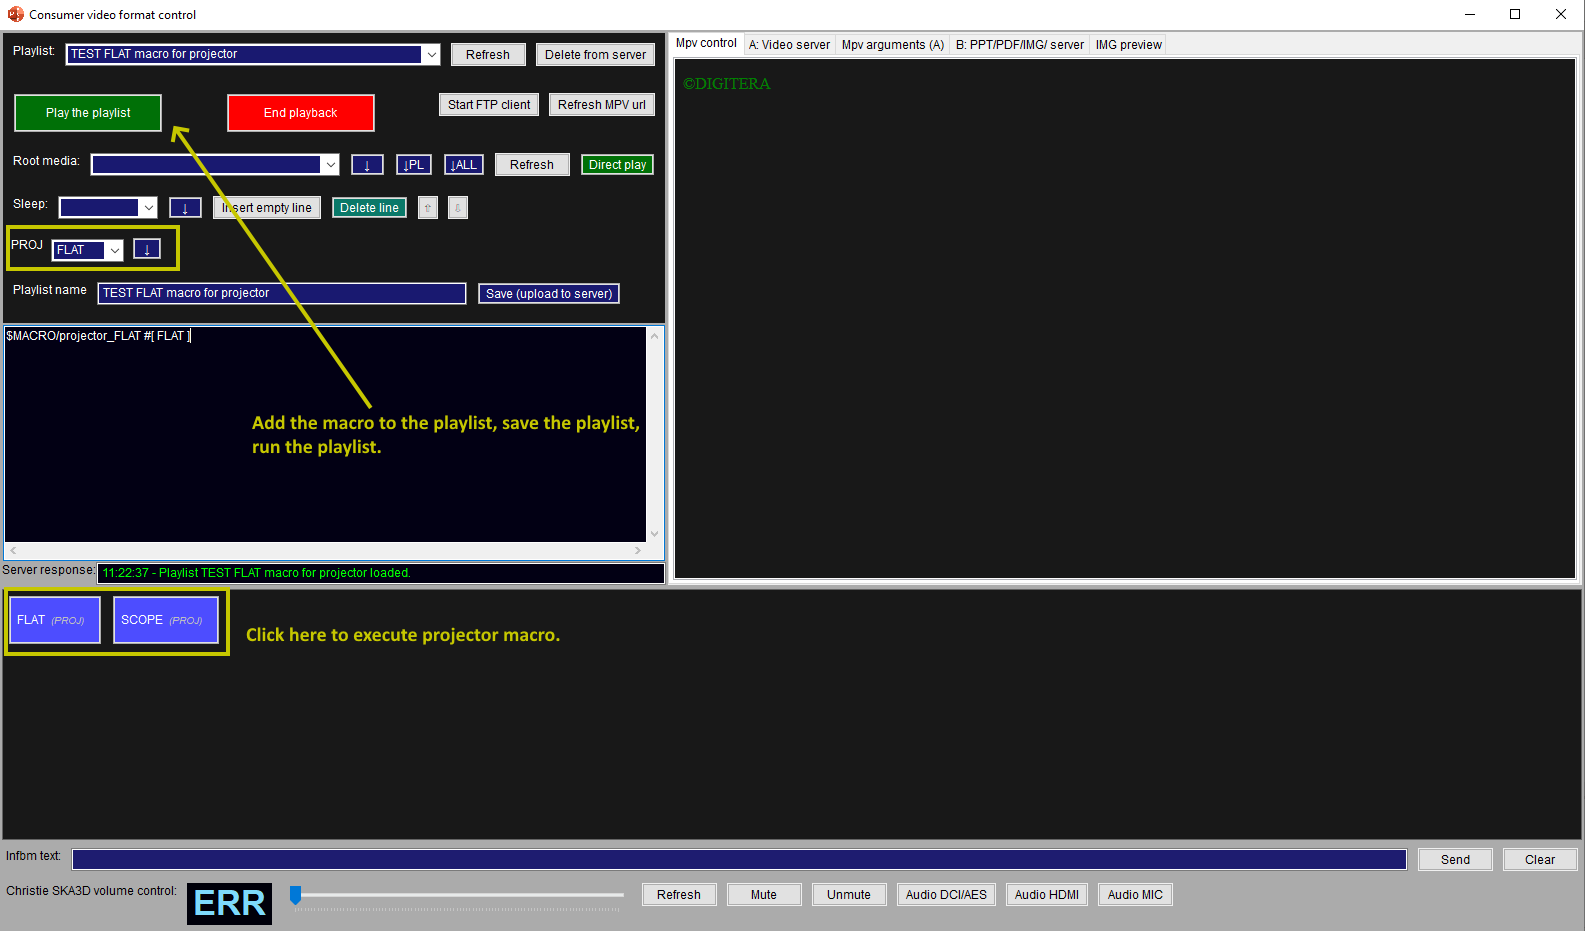
Let's start with projector macros first. You can skip this step if you don't know network commands for your projector, because everything can be done via IMS3000 macros. There are already two projector macros included in the ~/kino-player/_scripts directory: projector_FLAT and projector_SCOPE. As already mentioned in the Linux server section, these are one line scripts for channel change on Christie projectors.
Open macro-import.txt and add these two projector macros:
# [group]:[name]:[script name]:[argument]:[custom network command][button color hex code]{-}
# If no script name is set, name is used as a script name.
# Max 3 different types are supported for scripts (3 types - 3 combo boxes in order of first appearance).
# Default network command is the same as script name (kino-player/script/[script_name])
# Custom network commands are defined in server.
# If line ends with minus sign, macro is not added to execution list but only in to the combo boxes for playlist creation.

[PROJ]:[FLAT]:[projector_FLAT]:[]:[]:[#4d4dff]
[PROJ]:[SCOPE]:[projector_SCOPE]:[]:[]:[#4d4dff]
There are no custom network commands available for projector macros. Linux tcp server just executes the appropriate shell script in the ~/kino-player/_scripts directory. There are no arguments for these 2 scripts.
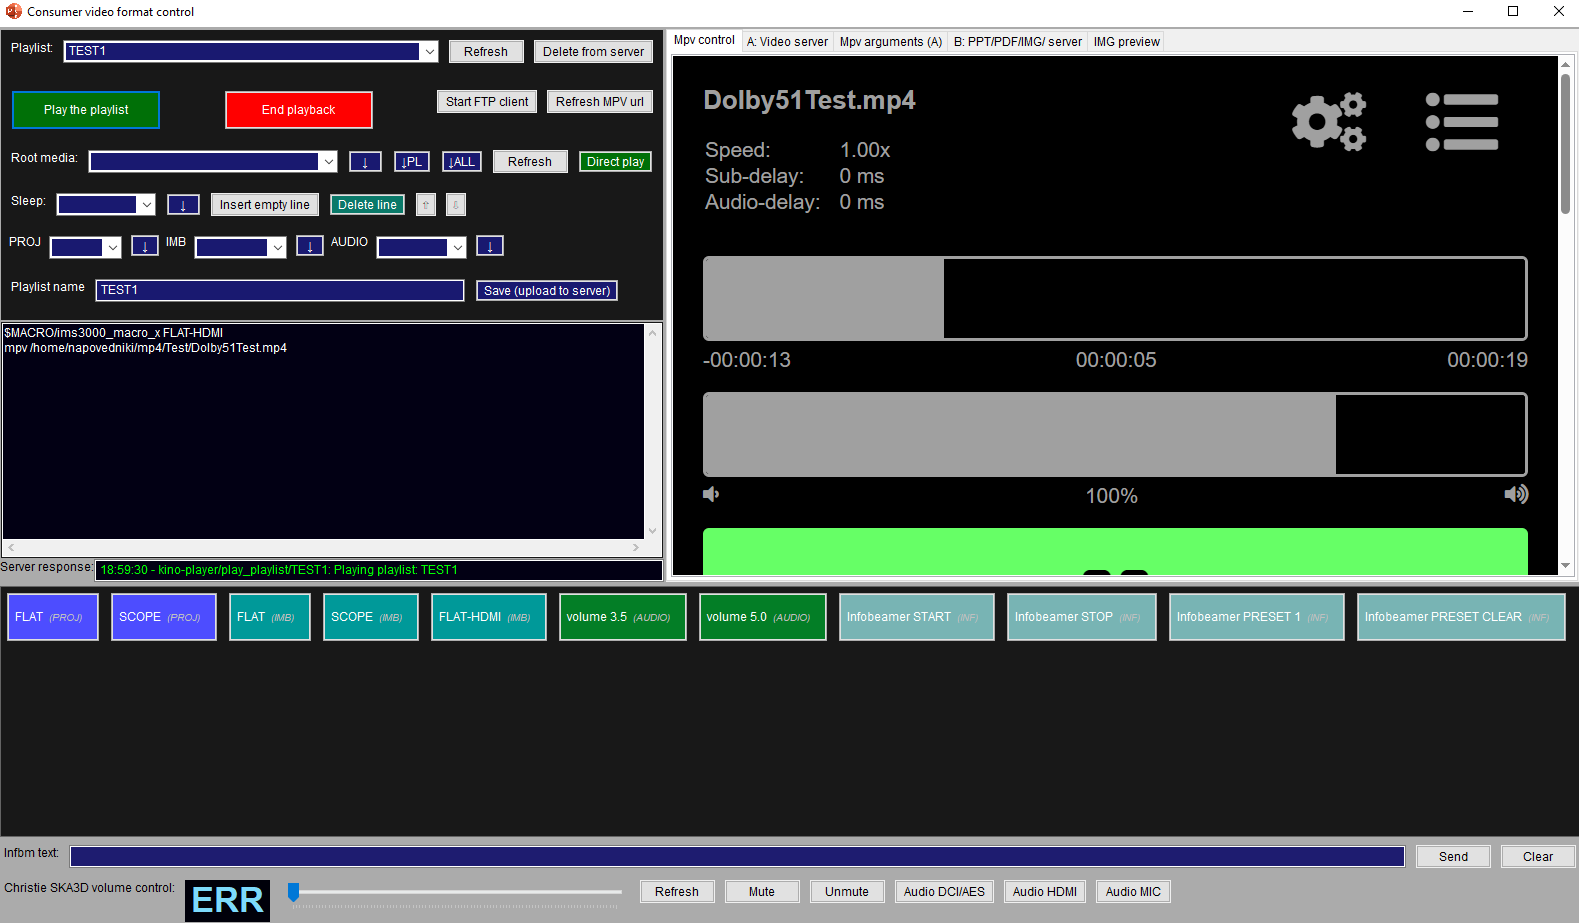
If you run the application now, it will look like this:
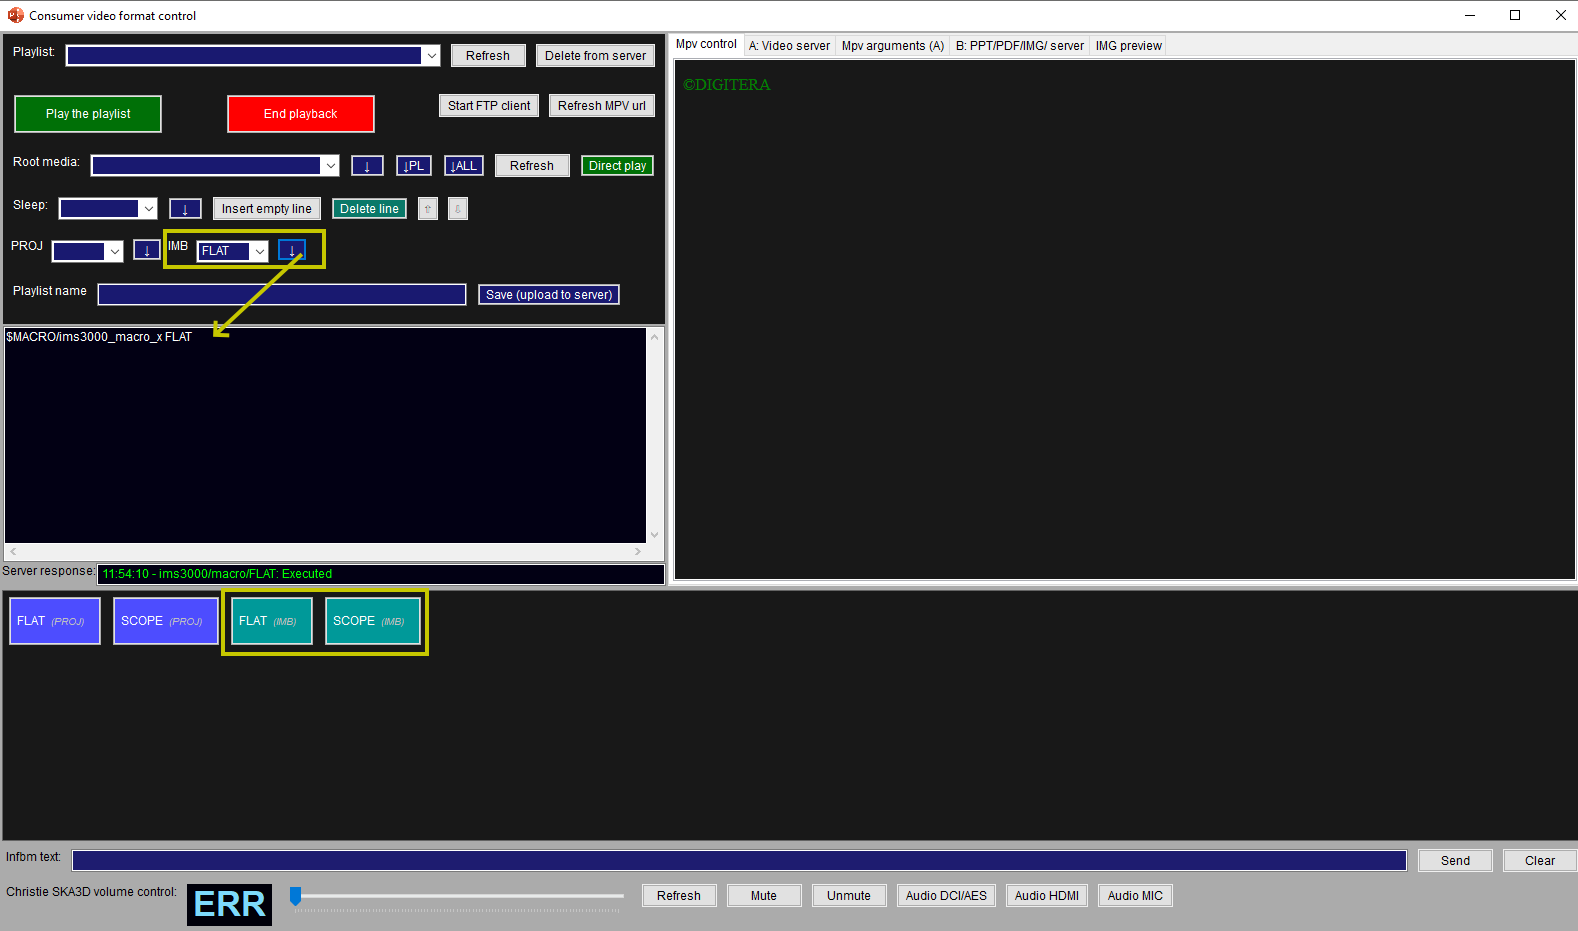
Let's add the same functionality, but this time via Dolby IMS 3000 macros. I assume you already have FLAT and SCOPE macros on your IMS3000. If they are named differently, use that names.
....
[PROJ]:[FLAT]:[projector_FLAT]:[]:[]:[#4d4dff]
[PROJ]:[SCOPE]:[projector_SCOPE]:[]:[]:[#4d4dff]

[IMB]:[FLAT]:[ims3000_macro_x]:[FLAT]:[ims3000/macro/]:[#009999]
[IMB]:[SCOPE]:[ims3000_macro_x]:[SCOPE]:[ims3000/macro/]:[#009999]
These two commands now also have a custom network command. This works better, because the button gives you feedback when command is executed on the IMS3000.
echo -ne 's mstervol' $1'\r\n' | netcat -q5 -w5 192.168.100.120 23&
[AUDIO]:[volume 3.5]:[volume_x]:[3.5]:[]:[#037E26]
[AUDIO]:[volume 5.0]:[volume_x]:[5.0]:[]:[#037E26]
Check the manual for your audio processor.
[INF]:[Infobeamer START]:[startinfbm]:[]:[nuc.startinfbm]
[INF]:[Infobeamer STOP]:[stopinfbm]:[]:[nuc.stopinfbm]
[INF]:[Infobeamer PRESET 1]:[infbm_preset_x]:[1]:[screen/picture/override:]
[INF]:[Infobeamer PRESET CLEAR]:[infbm_preset_clear]:[]:[screen/picture/clear:]
Windows server was written as a simple replacement for the ScreenMonkey application.
Like the Linux server, Windows server only executes the external applications which therefore makes the whole system more stable.
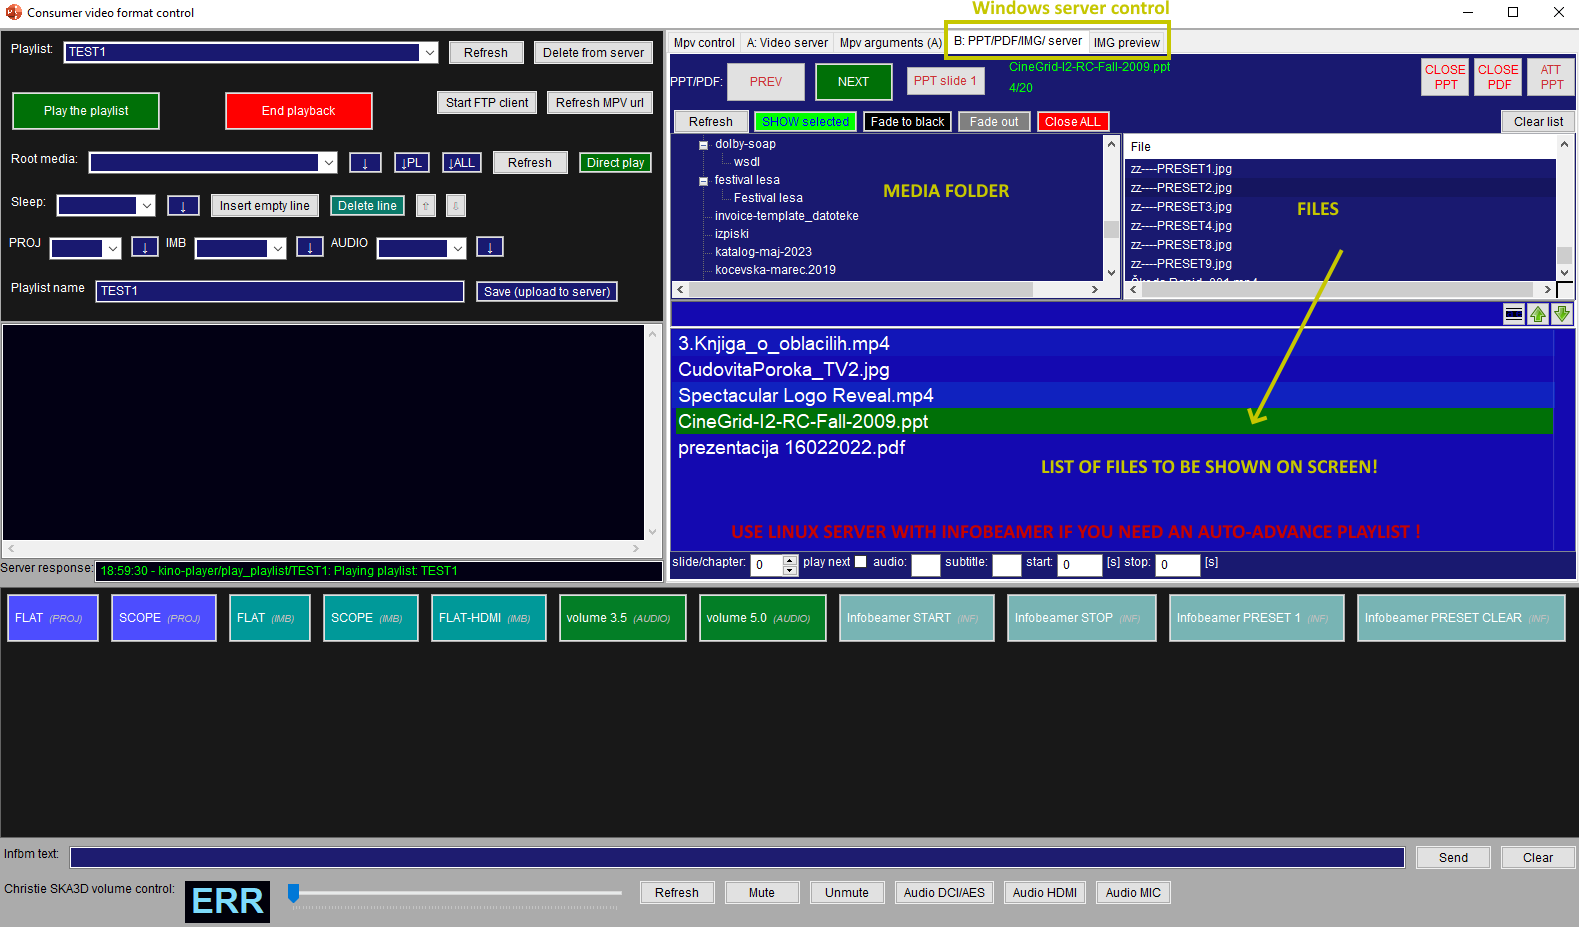
Last 2 tabs are used for Windows server control. If you start video playback from the PPT/PDF/IMG tab, you can then control it from the Mpv control tab. Mpv playback can't be controlled at the same time for both servers, however you can use 2 instances of this application with different settings.
 Download kino-server-linux-20240131-b.zip (Linux server)Download SMNetControlServer-windows-20240206.zip (Windows server)Download client-app-python-20240921.zip (Client application - python)Download client-app-pywin39_20240921.zip (Client application - windows executable)Download infobeamer-event-table.zip (Infobeamer script for event schedule display)